
Reader Question:
I wanted to know if there is a drip irrigation system that you guys would recommend! I don’t have such a big garden just a few raised beds! I seen your system and is huge but i just need something small! It would be really helpful! Thank You!
Choosing Your System:
Part of my day job description includes putting together irrigation construction documents for construction projects. Usually these documents are for huge sites with extensive systems involving thousands of feet of piping, dozens of valves and sometimes multiple controllers.
You’re probably scratching your head trying to make sense of what you just read. That’s OK because the typical home garden is not going to require all this fancy talk, but it will require a few necessary items to work well.
I like to set it and forget it, meaning I really don’t want to have think that much about watering. Of course, having a garden that would require several hours to water every other day is the reason for that, but even with smaller gardens you might want to think about going this route because sometimes life gets busy and you might not be able to water for a few days. If you have automatic irrigation you won’t have to worry about losing your garden that you’ve spent months nurturing.
I’m also of the mind that you should have a system even if you don’t necessarily need it. This was highlighted last summer with the severe drought in the Midwest My mom, who lives in Ohio, depended on summer rains to water her garden but the rains never came. The heat did though. She had to spend large amounts of her time hand watering just to keep everything alive. When you don’t need it you can just turn it off and when you do need it it’s nice to just be able to turn it back on and let it do its thing.
There are so many different types of irrigation how in the world do you choose one? My first word of advice is put down the pre-assembled “garden drip” irrigation kit at the big box store. Every site is unique and those kits do very little to accommodate even the average one. Second you’ll need to figure out if you want to do drip irrigation or overhead irrigation (which I won’t be covering here).
I recommend drip for several reasons. First it is low flow and the water is put directly on the soil at the rate the soil can absorb it. This reduces evaporation and eliminates drift from wind. It also reduces fungal diseases that can be caused by overhead watering while also being less likely to cause puddling and soil erosion. In addition, you’re less likely to have weeds when you control where the water is going through drip. The weeds have a tendency to congregate at the point source rather than spreading out across your entire bed. The downside of drip, however, is that it can be clunky to handle and it gets in the way of digging, hoeing, and raking the soil. It also doesn’t last as long and has to be checked over thoroughly before every season. To me, however, the saving in water (and $$$) is well worth these minor headaches.
Designing & Installing:
You will either need to draw up a site plan of the area you want to irrigate or get some construction marking paint (spray pain that can be applied when the can is upside down – usually comes in fluorescent colors). The main purpose of this is to find out how much PVC irrigation pipe you are going to need between your water source and the places you want to water. Generally the pipe will only need to run to the end of each bed closest to your water source. Rainbird, a popular irrigation supply company, has some design manuals online that you can use to help with your irrigation layout.
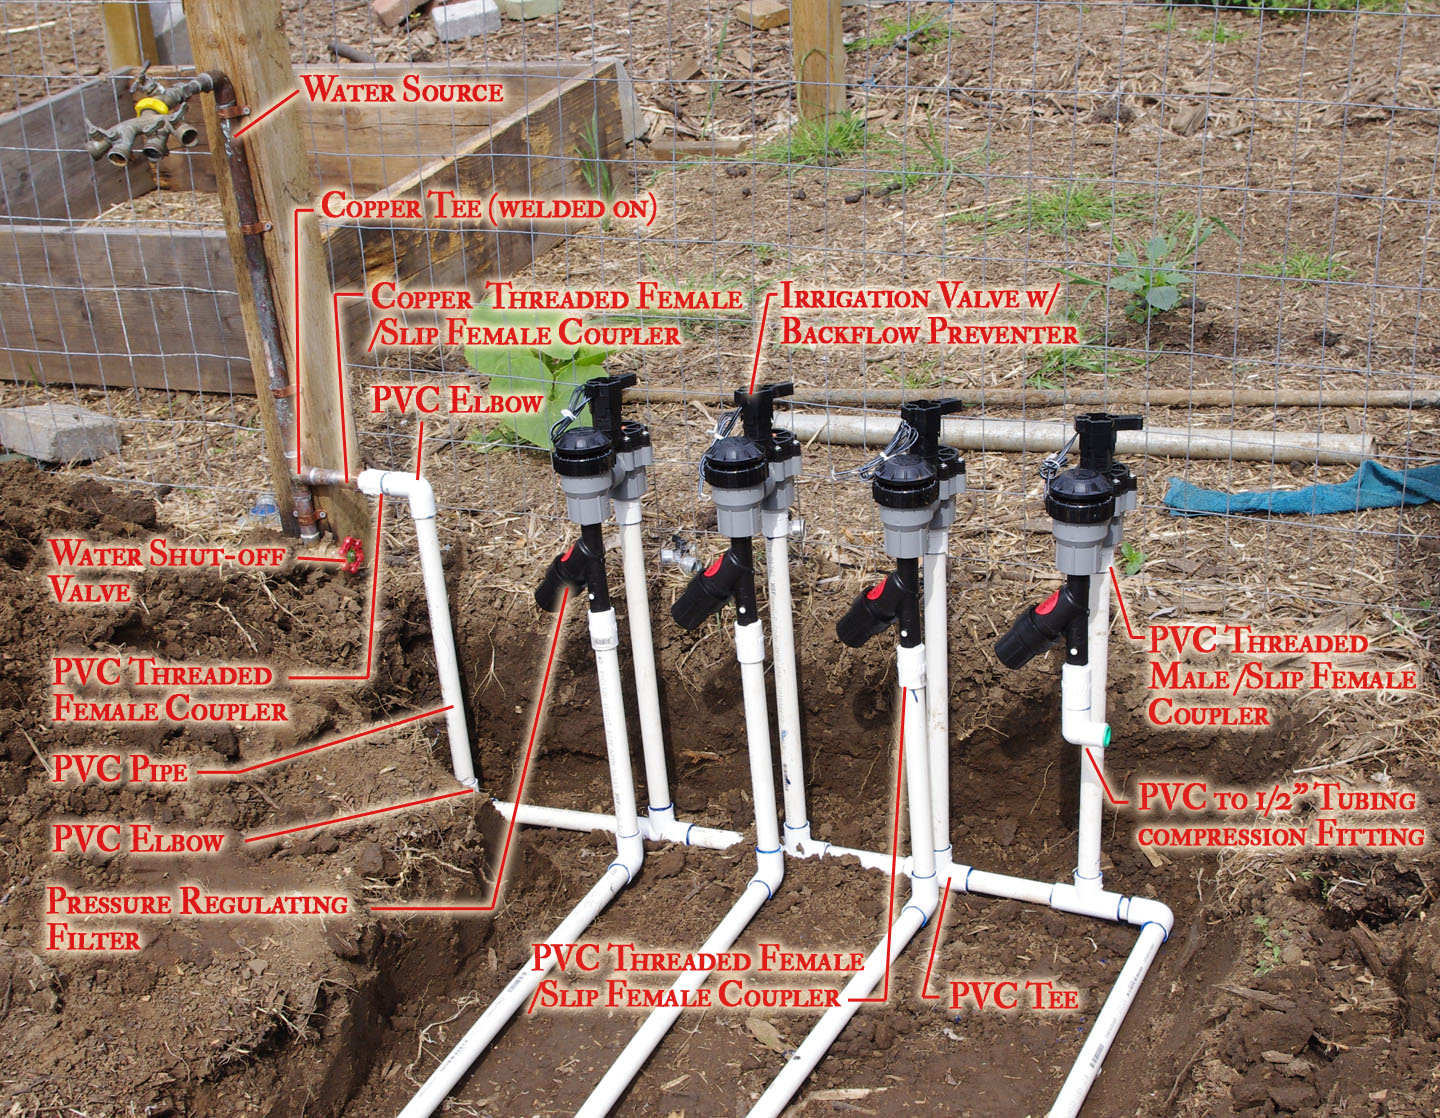
Basic valve setup. Click picture to enlarge.
Stick with 3/4″ Schedule 40 PVC pipe unless you’re doing a really large area on drip or you’re using spray. Then you’ll need to do pressure loss calculations but I’m not going to go into that here. Pipe is pretty cheap so if you purchase more than you need (which you will) it won’t break the bank. In addition to the pipe you’ll also need the joints (elbows, tees, 4-way, couplers, etc.). This is why a drawing is helpful. Keep in mind that any turns in the pipe are usually going to have to be at 90 degrees.
The photo above shows how we set up our valves. The valves are what turns the water on and off automatically (there is a manual switch as well). They are connected to an irrigation timer (also known as a controller) that is in our water tower by low voltage wire. When you enlarge the picture you can see the wires that you connect on the top of the valve (they haven’t been hooked up yet in this picture). If you just have a few raised beds you’ll probably only need one valve. We have three different watering zones – fruit trees, vegetable beds (we require two valves due to water pressure loss), drought tolerant landscape – which all require different watering schedules so we need to have four valves for our backyard.
It might look complicated but once you have all the parts you need it’s really not. Everything gets put together rather quickly. The hardest part of installing irrigation is digging the trenches for the pipe and electrical wires in my opinion.
For the threaded joints you’ll want to purchase plumbers/Teflon tape – a thin relatively stretchy white material that’s not sticky to the touch. With this you’re going to wrap the threads in the same direction you’ll be screwing on the fitting. This tape fills in any gaps in the threads, sealing it from leaking. Wrap it around about three times but don’t let it extend past the end of the threads as it can potentially clog your system if a small piece breaks off. For the PVC slip joints you’ll want to get pipe cement and primer. Some people claim that you can skip the primer, however, this is only true for systems that will not be pressurized. With drip systems the lines will have pressure when they are on so make sure to use primer first, otherwise you’ll end up with a lot of leaks that you can’t always fix. Primer is generally purple in color and you apply it first to the inside of the connector and the outside of the pipe. Allow it to dry a bit. You then apply the cement in the same fashion and insert the pipe into the connector. It should have a firm hold to finish connecting within a few minutes but don’t plan on running water through your system for at least 24 hours to allow the joint to cure.
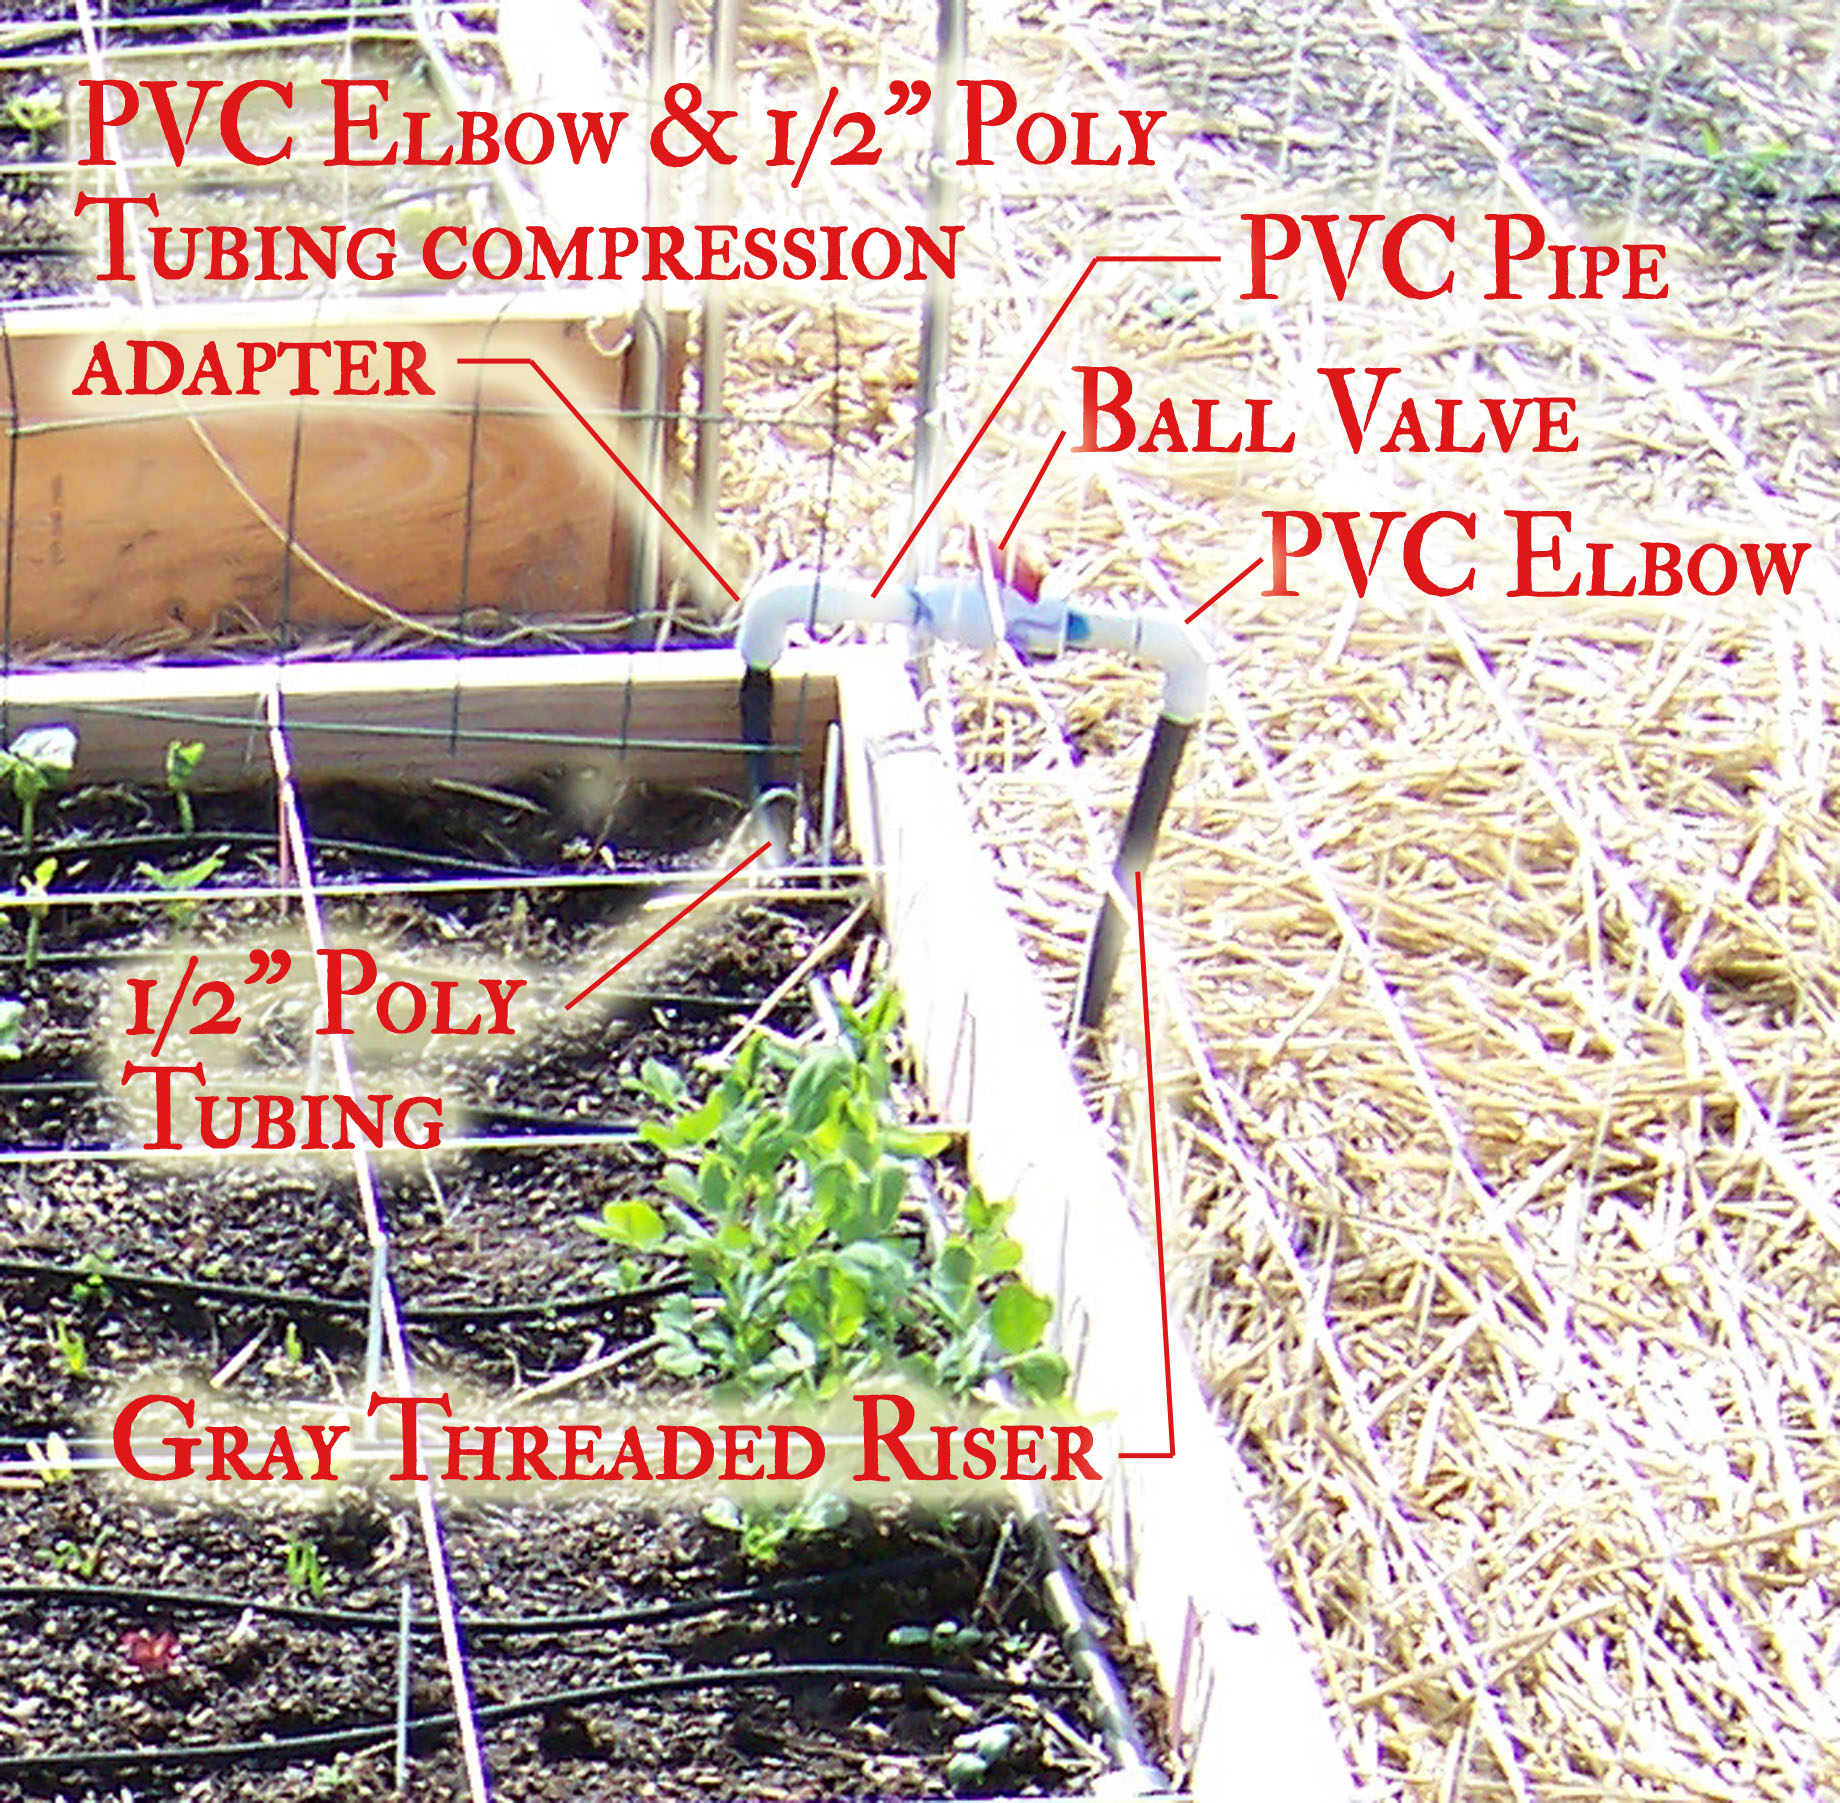
Irrigation hookup at each bed. Click photo to enlarge.
You’ll want to run pipe to your beds. Connect them with female slip joints and cement. I prefer the pipe riser for each bed to be located on the outside of the bed, though some prefer them on the inside. If the bed is already in place and filled it will have to be on the outside. On the left is what you need for each bed. The ball valve is important because it allows you to turn off individual beds when they aren’t planted. I like to use the threaded gray risers as they contain carbon to help make them more resistant to UV. You can use PVC though if you want to. just remember that if you use the threaded pipe you’ll need elbows with one end being threaded.
Now that you’ve got water to your beds you’ll want to get the dripline down in your bed. There are several options regarding the type of line you want to use. I personally like dripline with inline emitters because it’s easier to handle. You can get these in 1/2″ and 1/4″ size. With each of these sizes there are different emitter spacings within the line. The 1/2″ dripline’s smallest spacing is 12″ which might be too far for vegetable beds. The 1/4″ size comes in 6″ spacing so go with that. Some people like to use the porous soaker lines which look like black spongy material that “weeps” water when it’s turned on. If you have hard water or even just well water this type clogs really easily and you’ll need to replace it before the season is over (trust me, I’ve had to do this). The inline emitter dripline use turbulent flow to help keep the emitters from clogging.
Another option is drip tape. Drip tape is inexpensive and puts a good amount of water down in a relatively short time frame. Unfortunately it doesn’t last long. By our 2nd season we spent a good portion of our time repairing blown sections of it. It also requires a much lower water pressure to run correctly, which requires difficult to find pressure regulators.
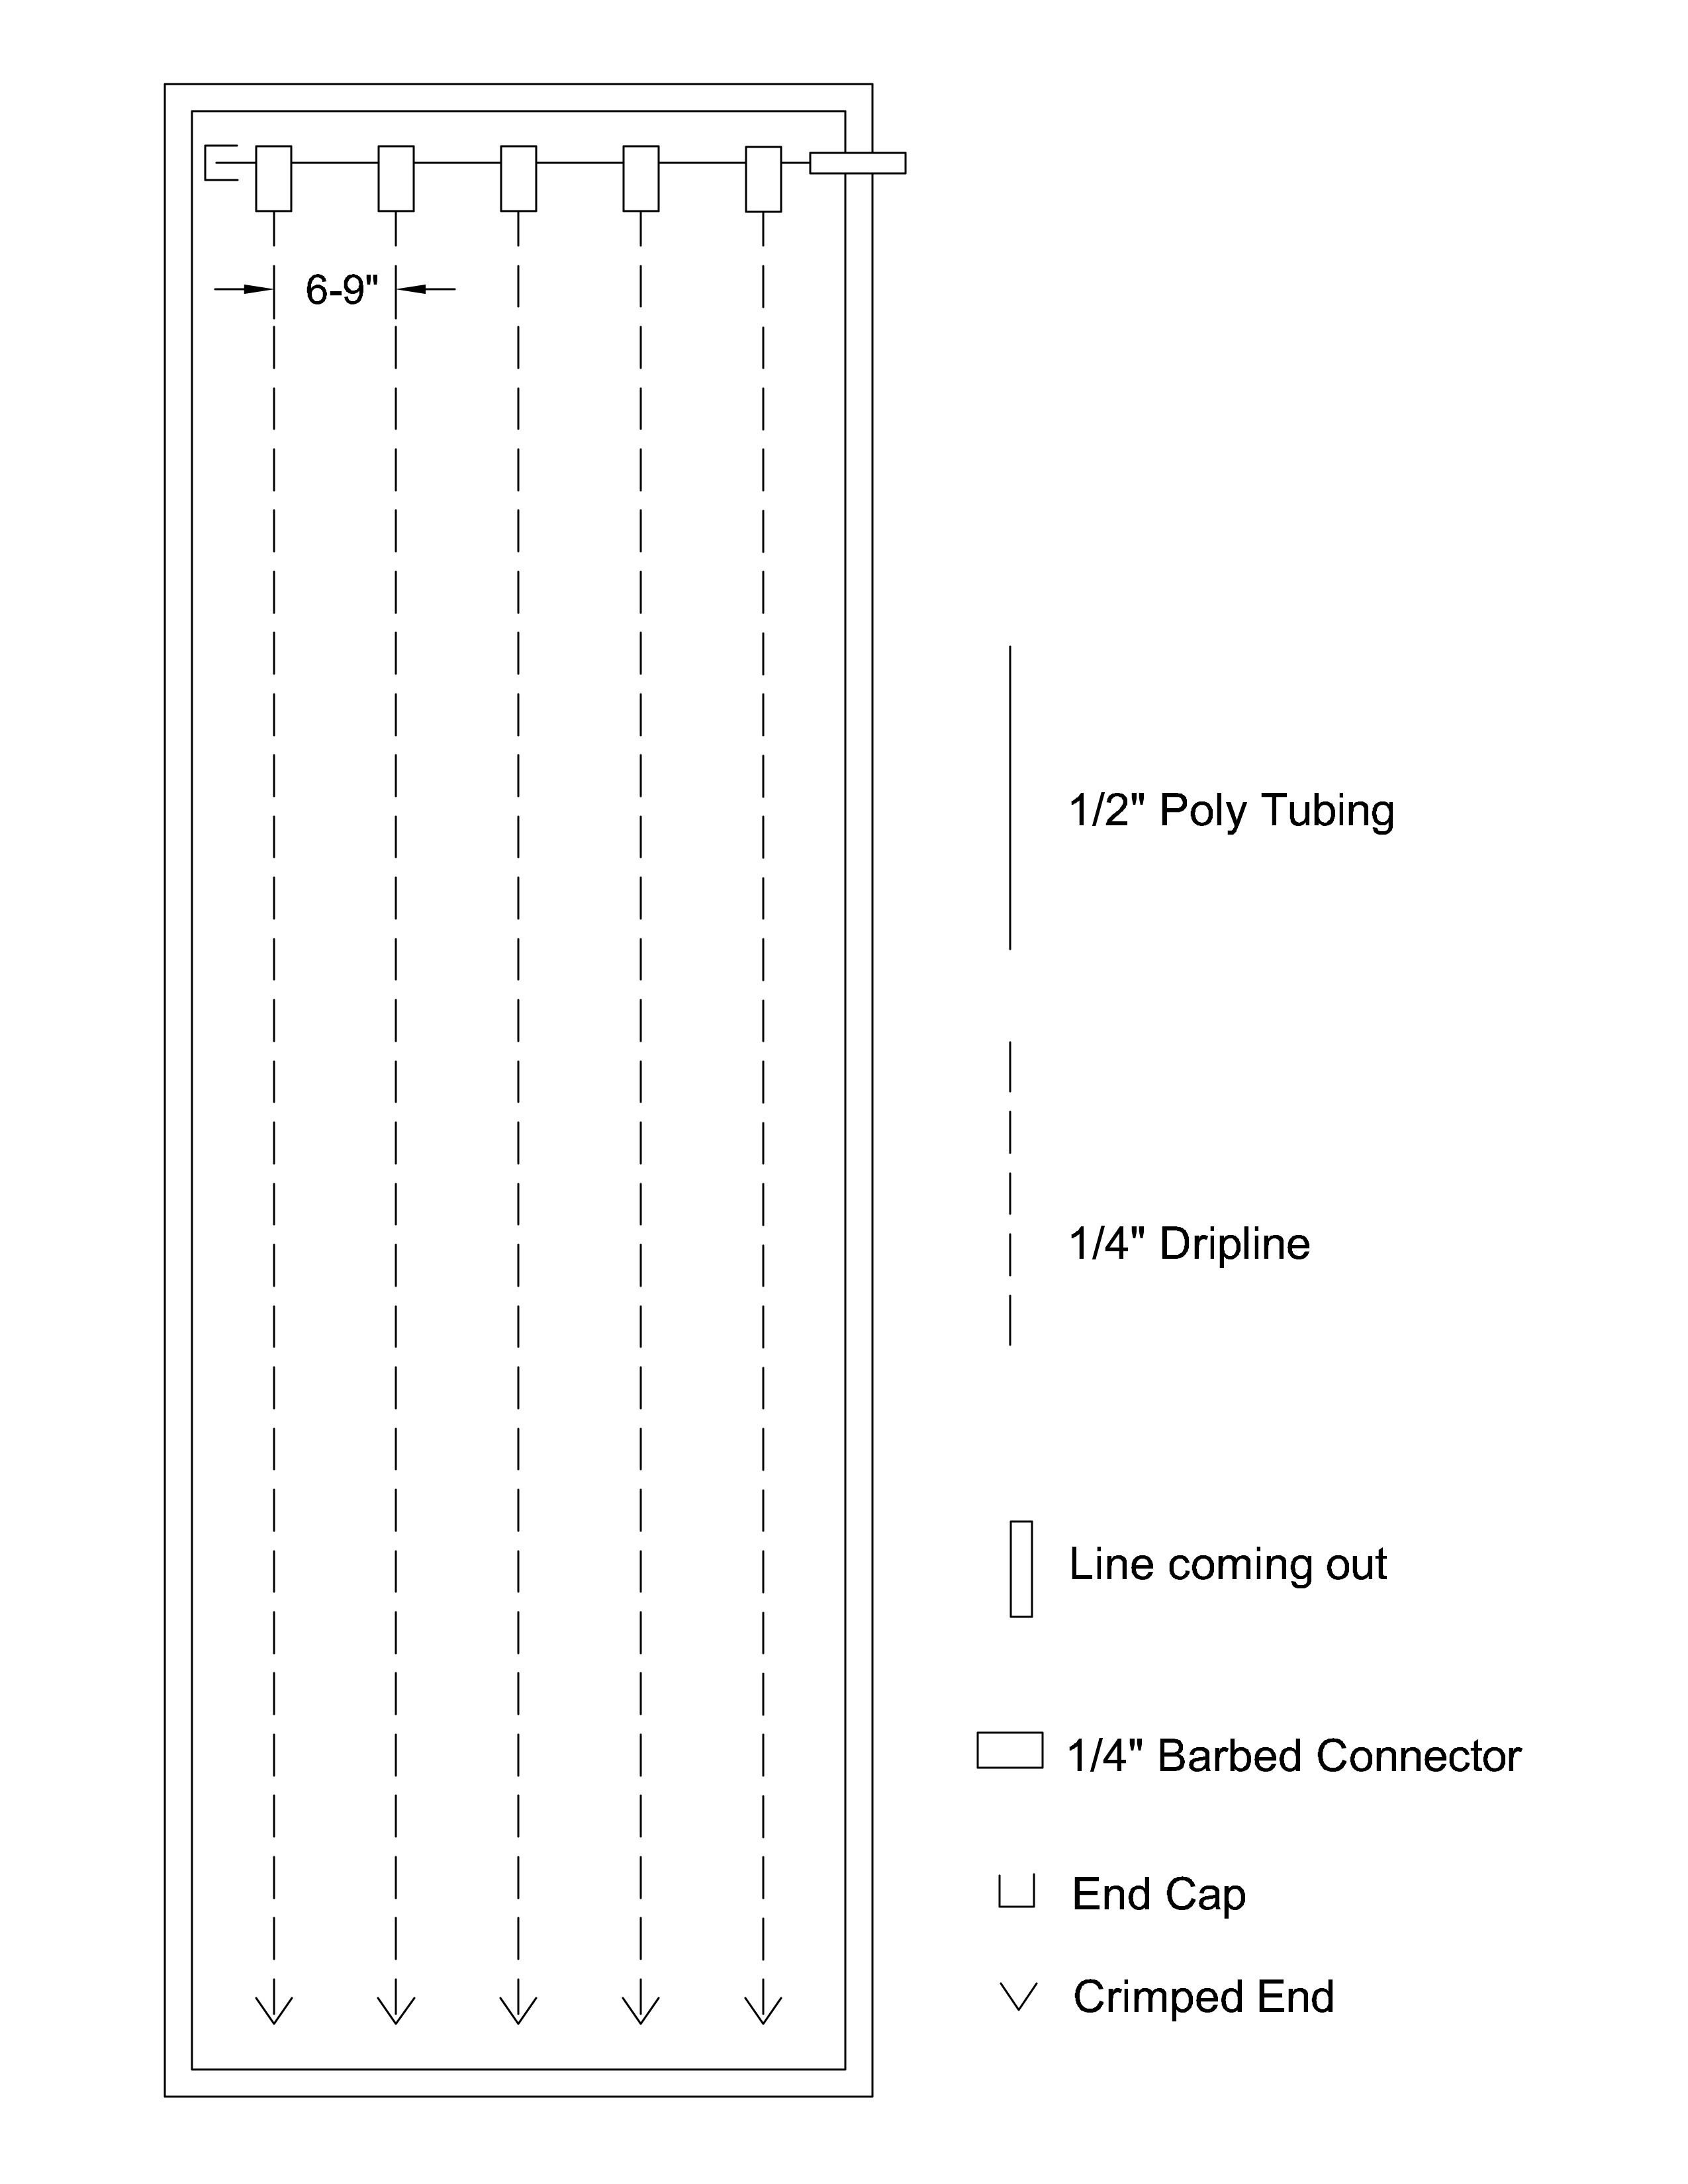 Once you figure out which type of dripline you want to use you’ll need to layout how you want to water it. I prefer to run the water source on the end of the long side versus the center of the short side. From the source you run 1/2″ poly across the short side and then cap it. At ever 6-9″ (spacing is personal preference and also depends on the width of your bed) you’ll insert a barbed 1/4″ tubing connector. There’s a poly tubing hole punch gun that makes this job MUCH easier. Connect 1/4″ dripline tubing to the barbed connector and run it to the end of the bed. Crimp the end and stake it down. You can buy end clamps or just use zip ties.
One more thing you’re going to need to consider – when dealing with poly tubing you want to either use universal fittings or fittings that are the same brand as the tubing. Different manufacturers vary the size of the tubing ever so slightly so the fittings of another manufacturer (unless they are universal) will not work on their tubing. The links in the following list are just to give you an idea of what you’re looking for. They don’t necessarily work together. Your best option is to purchase everything from the same store, which will generally have compatible parts.
The Basic Supplies for Automatic Drip Irrigation
- Controller/Irrigation Timer
- Sprinkler wire with wire splice connectors
- Anti-siphon valve with atmospheric vacuum breaker & pressure regulating filter
- 3/4″ PVC pipe
- Various 3/4″ PVC connectors – couplers, elbows, tees, risers, adapter
- Teflon tape
- PVC primer
- PVC cement
- Supplies to connect to water source
- 3/4″ Ball valve (one per bed)
- 1/2″ Poly Tubing Compression Adaptor (one per bed)
- 1/2″ Poly Tubing
- 1/4″ dripline
- Punch gun
- 1/4″ barbed connectors
- End clamps
- Stakes
A word about controllers
With controllers you can go cheap or you can go expensive, but either way, it will most likely be your most expensive piece of irrigation equipment. The more costly a controller is, the more features it will have such as being able to attach rain sensors, soil moisture sensors, or more programs and stations. The one I’ve linked to is the one that I own and have been very happy with it. It has a rain delay and a rain shutoff switch so I can turn it off during the winter and when it’s time to run it again, it keeps all my previous programs. The programming is relatively easy to do as well.
One thing I will caution you against is getting battery operated controllers that also double as a valve. In my opinion (and experience), these are not reliable and go out regularly. The worst is when you’re on vacation and the battery goes out with the valve open (yeah, this happens more than you’d think).

Rachel – Thank you, thank you, thank you. This is hands down, the best and most detailed description of installing a drip irrigation system for the home urban farmer that I have ever read. You rock!
Hi Rachel – Great post. I have a similar irrigation setup (only 2 valves though. Question: why do you have 4x pressure reducers, rather than one upstream of the valves? Do the valves not work at lower pressure?
Shawn, pressure regulators can be damaged if left under constant pressure which would occur if put before the valve.
Thanks – I didn’t know that.
Related note – have you ever seen anyone “inject” compost tea into a dripper system? Looking for ideas.
There are various fertilizer injection systems for drip irrigation. Here are a few to choose from: http://www.groworganic.com/irrigation/fertilizer-injector.html
Hello!
This is such great information. For a smaller bed set up do I need to run a separate piece of PVC from the water source to each bed? Could I run two long lengths of PVC with “risers” for each bed? Thank you!!
You can just do one line with risers at each bed.